 English
 Espaol
 Franais
 阿拉伯
阿拉伯 中文
中文 Deutsch
 Italiano
 Português
 日本
日本 韓國(guó)
 български
 hrvatski
 esky
esky Dansk
Dansk Nederlands
 suomi
suomi Ελληνικ
 印度
印度 norsk
norsk Polski
 Roman
Roman русский
 Svenska
Perkins珀金斯1306-E87TA86柴油發(fā)動(dòng)機(jī)1830624 C1汽缸蓋蓋供應(yīng)商,Perkins珀金斯1306-E87TA86柴油發(fā)動(dòng)機(jī)1830624 C1汽缸蓋蓋技術(shù)價(jià)格規(guī)格咨詢服務(wù),Perkins珀金斯1306-E87TA86柴油發(fā)動(dòng)機(jī)1830624 C1汽缸蓋蓋零配件供應(yīng),Perkins珀金斯1306-E87TA86柴油發(fā)動(dòng)機(jī)1830624 C1汽缸蓋蓋售后服務(wù)中心,Perkins珀金斯1306-E87TA86柴油發(fā)動(dòng)機(jī)1830624 C1汽缸蓋蓋,Perkins珀金斯1306-E87TA86柴油發(fā)動(dòng)機(jī)1830624 C1汽缸蓋蓋詳細(xì)的技術(shù)參數(shù),

首頁(yè)
產(chǎn)品展示>Perkins珀金斯1306-E87TA86柴油發(fā)動(dòng)機(jī)1830624 C1汽缸蓋蓋
產(chǎn)品中心
美國(guó)強(qiáng)鹿柴油機(jī)維修配件技術(shù)中心
約翰迪爾John Deere柴油機(jī)配件 美國(guó)麥克福斯
卡特彼勒柴油發(fā)動(dòng)機(jī)參數(shù)
沃爾沃發(fā)動(dòng)機(jī)全系參數(shù)
英國(guó)珀金斯原廠配件
珀金斯柴油機(jī)技術(shù)中心
珀金斯發(fā)動(dòng)機(jī)零件查詢圖冊(cè)
日本三菱柴油機(jī)發(fā)電機(jī)配件
德國(guó)道依茨 韓國(guó)大宇柴油發(fā)動(dòng)機(jī)配件
康明斯全系列柴油發(fā)動(dòng)機(jī)
沃爾沃 MTU 原廠配件銷售中心
瑞典沃爾沃遍達(dá)原裝柴油機(jī)配件
康明斯維修技術(shù)中心
卡特彼勒柴油發(fā)動(dòng)機(jī)原廠配件銷售中心
品牌柴油發(fā)電機(jī)組
康明斯柴油發(fā)動(dòng)機(jī)配件中心
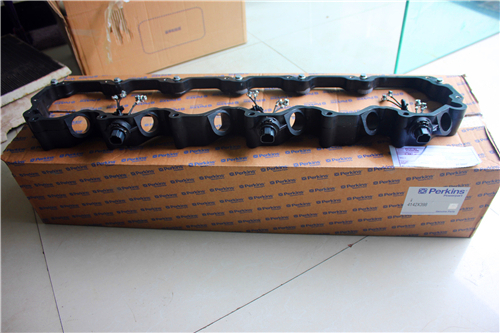
Perkins珀金斯1306-E87TA86柴油發(fā)動(dòng)機(jī)1830624 C1汽缸蓋蓋
詳細(xì)描述
項(xiàng)目 零配件號(hào)碼 新件號(hào) 描述
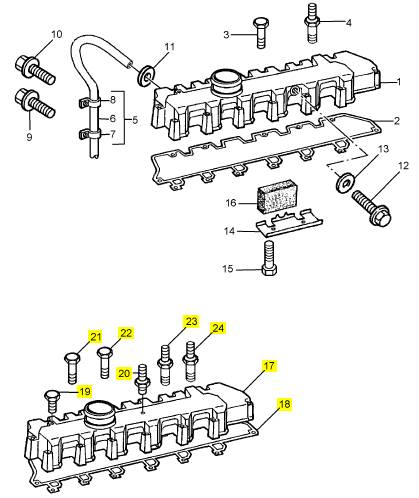
17 1830624 C1 1 1830624 C1 汽缸蓋蓋
18 1820909 C1 1 1825602 C92 密封墊片 - 搖臂的砂箱蓋
19 444612 1 444613 栓塞
20 1 螺紋接管
21 1817961 C1 6 1817961 C1 公制的螺拴
22 1818693 C1 3 1818693 C1 公制的螺拴
23 1819245 C1 2 1819245 C1 圖釘
24 1823742 C1 3 1823742 C1 圖釘
項(xiàng)目 零配件號(hào)碼 新件號(hào) 描述
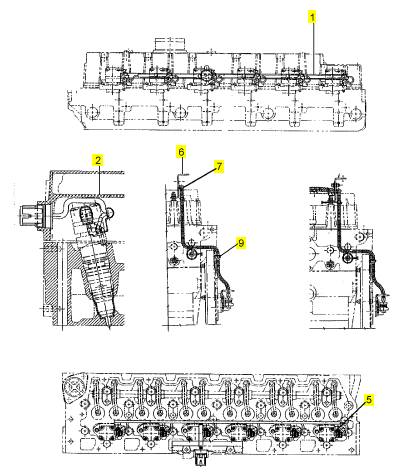
1 1807296 C1 1 檢查歷史 通風(fēng)槽
2 1898968 C91 1 檢查歷史 馬具裝備
2 1807285 C92 1 檢查歷史 噴油器馬具
2 1807455 C91 1 檢查歷史 噴油器馬具
2 1807455 C92 1 檢查歷史 噴油器馬具
5 30360 R1 6 30360 R1 螺旋
6 2002176 C2 1 2002176 C2 夾
6 2002176 C1 1 2002176 C2 夾
7 1889275 C93 1 1889275 C93 線束
7 1807419 C95 1 檢查歷史 線束
7 1807419 C96 1 檢查歷史 線束
7 1889275 C91 1 1889275 C91 線束
7 1889275 C92 1 1889275 C93 線束
8 1889995 C91 1 1889995 C91 油溫度感應(yīng)傳感器裝備
8 1807419 C96 1 檢查歷史 線束
9 1837148 C1 1 1837148 C1 接線夾
9 2003460 C1 1 406381 C1 夾
10 1833417 C2 2 1833417 C2 接線夾
10 2003460 C1 1 406381 C1 夾
11 40050 R1 2 40050 R1 螺帽
11 1817953 C1 1 1817953 C1 公制的螺拴
12 30175 R1 2 30175 R1 墊圈
12 1817953 C1 1 1817953 C1 公制的螺拴
|
Peregrine EDi and 1300 Series EDi Method two |
|
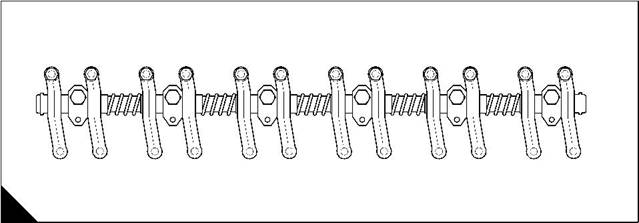
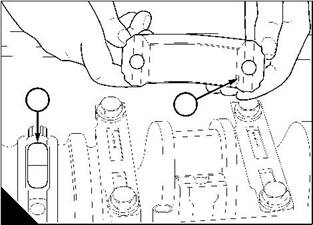
1 Remove the rocker cover, see Operation 3-1. |
|
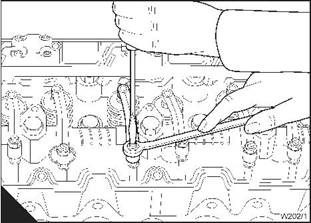
2 Rotate the crankshaft in the normal direction of rotation until the inlet valve (C11) of number 6 cylinder has just opened and the exhaust valve (C12) of the same cylinder has not closed fully. |
|
3 Check the clearances of the valves (C1, C2, C3, C6, C7, and C10) and adjust them, if necessary. |
|
4 Rotate the crankshaft in the normal direction of rotation until the inlet valve (C1) of number 1 cylinder has just opened and the exhaust valve (C2) of the same cylinder has not closed fully. |
|
5 Check the clearances (D) of the valves (C4, C5, C8, C9, C11, and C12) and adjust them, if necessary. 6 Fit the rocker cover, see Operation 3-2. |
|
1 |
|
2 |
|
3 |
|
4 |
|
5 |
|
6 |
|
7 |
|
8 |
|
9 |
|
10 |
|
11 |
|
12 |
|
C |
|
W015 |
|
' |
|
Workshop Manual, TPD 1353E, Issue 3 |
|
49 |
|
This document has been printed from SPI². Not for Resale |
![]()
![]()
|
This page is intentionally blank |
|
This document has been printed from SPI². Not for Resale |
|
Peregrine EDi and 1300 Series EDi |
|
4 |
|
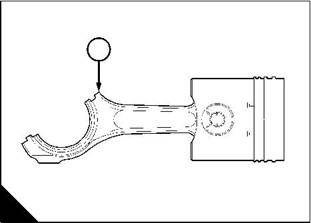
Piston and connecting rod assemblies |
|
4 |
|
General description |
|
The aluminium alloy pistons have a cast iron insert for the top piston ring. |
|
The two-piece pistons have an aluminium alloy skirt and a steel piston crown. The steel crown compensates for increased combustion pressures, and can be removed from the piston skirt, when the piston assembly is dismantled. |
|
Both types of piston have recesses in the crown to allow clearance for the inlet and exhaust valves. The combustion bowl is off-centre. |
|
A variation in the aluminium alloy along the length of the piston skirt controls expansion of the piston. |
|
Each piston has two tapered compression rings and an oil control ring. The grooves for the piston rings have the same shape as their rings. The top compression ring is marked "TOP-UP" on its upper face, the second compression ring is marked “2nd-UP” on its upper face. The oil control ring is not marked, and new rings may be fitted either way up. The top compression ring has a round edge, the edge of the second compression ring is at an angle. |
|
Combustion pressure is allowed to pass through the ring gaps to the underside of the compression rings. This maintains the correct contact between the face of the piston rings and the cylinder bore, to improve performance and reduce oil loss. |
|
Axial location of the fully floating gudgeon pin is by circlips. |
|
The connecting rods are "H" section forgings of steel. The small end is wedge shaped to improve strength and reliability. The overall length of the connecting rod is reduced by an angle of tilt to the big end bearing. |
|
Jets fitted in the cylinder block spray lubricating oil onto the inner surface of the piston to cool the piston. |
|
Workshop Manual, TPD 1353E, Issue 3 |
|
51 |
|
This document has been printed from SPI². Not for Resale |
![]()
![]()
|
4 |
|
Peregrine EDi and 1300 Series EDi |
|
Big end bearing |
|
To remove |
|
Operation 4-1 |
|
1 Drain the engine lubricating oil. |
|
2 Remove the lubricating oil sump, see Operation 10-9. |
|
3 Remove the lubricating oil strainer and suction pipe, see Operation 10-11. 4 Rotate the crankshaft until access to the relevant connecting rod setscrews is possible. 5 Remove the setscrews from the connecting rod. |
|
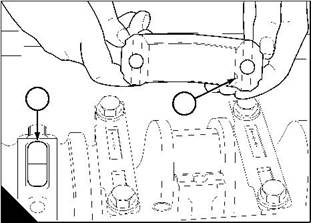
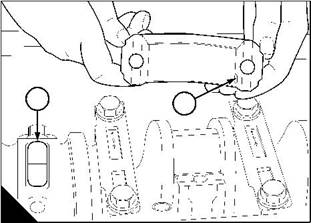
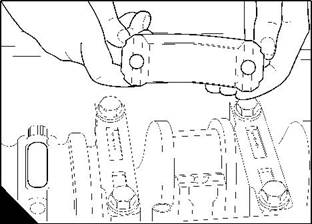
6 Remove the bearing cap (A) together with the lower shell-bearing. |
|
7 Carefully push the connecting rod up the cylinder bore (B), just enough to allow access to the upper shell- bearing. |
|
8 Remove the upper half of the shell bearing from the connecting rod. Keep the bearings of the connecting rods and caps together, for correct assembly. |
|
1 |
|
2 |
|
190 |
|
4 |
|
5 |
|
190 |
|
A |
|
B |
|
W082 |
|
W083 |
|
52 |
|
Workshop Manual, TPD 1353E, Issue 3 |
|
This document has been printed from SPI². Not for Resale |
![]()
![]()
![]()
![]()
|
4 |
|
Peregrine EDi and 1300 Series EDi To fit |
|
Operation 4-2 |
|
1 Clean the bearing faces of the connecting rod and the crank pin. Clean the threads of the connecting rod and the threads of the setscrews. |
|
2 Clean the complete bearing and lubricate the bearing surface and the crank pin with clean engine lubricating oil. |
|
3 Fit the upper half of the shell bearing to the connecting rod, ensure that the locating tag is fitted correctly in its recess. |
|
4 Fit the connecting rod to the crankpin; ensure that the short side (B1) of the connecting rod is toward the camshaft side of the engine. |
|
5 Fit the lower shell-bearing into the cap, ensure that the locating tag (A2) is fitted correctly in its recess. 6 Lubricate lightly the threads and the thrust faces of the setscrews with clean engine lubricating oil. |
|
7 Hold the bearing cap in position on the connecting rod. Ensure that the assembly number on the cap is the same as the number on the connecting rod and that both of the assembly numbers are on the same side (A1). |
|
Caution: Do not try to recondition the threads in the connecting rod. If the threads are damaged, renew the connecting rod. |
|
8 Fit the setscrews by hand. If they do not fit freely by hand, fit new setscrews. If the new setscrews do not fit freely by hand, renew the connecting rod. |
|
9 Tighten the setscrews gradually and evenly to 156 Nm (115 lbf ft) 15,9 kgf m. 10 Ensure that the crankshaft rotates freely. |
|
11 Fit the lubricating oil strainer and suction pipe, see Operation 10-11. 12 Fit the lubricating oil sump, see Operation 10-10. |
|
13 Fill the sump to the correct level with lubricating oil of an approved grade, see Chapter 5 in the User’s Handbook. |
|
1 |
|
1 |
|
2 |
|
190 |
|
4 |
|
5 |
|
190 |
|
A |
|
B |
|
W082 |
|
W084/1 |
|
Workshop Manual, TPD 1353E, Issue 3 |
|
53 |
|
This document has been printed from SPI². Not for Resale |
![]()
![]()
![]()
![]()
|
4 |
|
Peregrine EDi and 1300 Series EDi |
|
To inspect |
|
Operation 4-3 |
|
Check the bearings and the crank pin for wear or other damage. |
|
Measure the crank pins and compare the measurements with those given in the relevant Data and dimensions for the "Crank pins" on page 14. |
|
54 |
|
Workshop Manual, TPD 1353E, Issue 3 |
|
This document has been printed from SPI². Not for Resale |
![]()
![]()
![]()
![]()
|
4 |
|
Peregrine EDi and 1300 Series EDi |
|
Piston and connecting rod assembly |
|
To remove |
|
Operation 4-4 |
|
1 Drain the lubricating oil. |
|
2 Drain the cooling system. |
|
3 Remove the cylinder head assembly, see Operation 3-8. 4 Remove all carbon from the top of the bores of the cylinder liners. 5 Remove the lubricating oil sump, see Operation 10-9. 6 Remove the lubricating oil strainer and suction pipe, see Operation 10-11. |
|
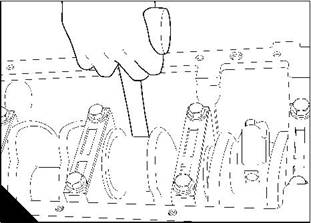
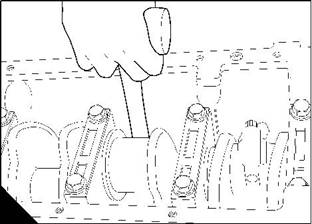
7 Remove the setscrews (C5) for the big end bearing cap and remove the big end bearing cap (A). 8 Push the piston and the connecting rod assembly (B) out through the top of their cylinders. |
|
190 |
|
4 |
|
5 |
|
190 |
|
A |
|
B |
|
W082/1 |
|
W083 |
|
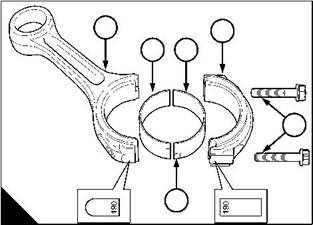
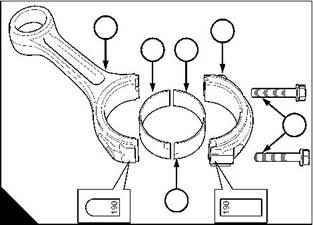
9 Put the shell-bearings (C2 and C3) and the bearing cap (C4) with the piston and connecting rod (C1) assembly; mark the components to ensure that they are returned to the correct cylinder. |
|
10 Inspect the crank pin for damage. |
|
1 |
|
4 |
|
2 |
|
3 |
|
5 |
|
6 |
|
C |
|
W079 |
|
Workshop Manual, TPD 1353E, Issue 3 |
|
55 |
|
This document has been printed from SPI². Not for Resale |
![]()
![]()
![]()
![]()
|
4 |
|
Peregrine EDi and 1300 Series EDi |
|
To fit |
|
Operation 4-5 |
|
Caution: If the original piston is used, ensure that it is assembled to the correct connecting rod and that it is used in the original cylinder. |
|
1 Ensure that the piston, the cylinder bore, the crank pin and the big end of the connecting rod is clean. 2 Clean the threads of the connecting rod (B1) and the threads of the setscrews (B5). 3 The piston has drain holes for the lubricating oil, check that these holes are free of debris. 4 Lubricate the piston and the cylinder liner with clean engine lubricating oil. |
|
5 Rotate the crankshaft until access to fit the connecting rod setscrews is possible. |
|
6 Clean the shell bearings (B2 and B3) and lubricate the bearing surface and the crank pin with clean engine lubricating oil. |
|
7 Fit the upper shell-bearing (B2) to the connecting rod, ensure that the locating tag is fitted correctly in its recess. |
|
8 Put the piston ring gaps 120° apart and compress the rings with a suitable tool. |
|
9 Pass the connecting rod and piston assembly into the cylinder. Ensure that the “camside” mark on the piston crown is towards the camshaft side of the engine. |
|
10 Push the piston and connecting rod assembly through the piston ring clamp and onto the crank pin. Ensure that the short side (Operation 4-2/B1) of the connecting rod is towards the camshaft side of the engine. |
|
11 Fit the lower shell-bearing onto its cap, ensure that the locating tag is fitted correctly in its recess (A2). 12 Lubricate lightly the threads of the setscrews with clean engine lubricating oil. |
|
13 Hold the bearing cap in position on the connecting rod. Ensure that the assembly number on the cap is the same as the number on the connecting rod and that both of the assembly numbers are on the same side (A1). |
|
Caution: Do not try to recondition the threads in the connecting rod. If the threads are damaged, renew the connecting rod, . |
|
1 |
|
4 |
|
2 |
|
3 |
|
1 |
|
2 |
|
5 |
|
190 190 |
|
4 |
|
5 |
|
6 |
|
A |
|
B |
|
W082 |
|
W079 |
|
Continued |
|
56 |
|
Workshop Manual, TPD 1353E, Issue 3 |
|
This document has been printed from SPI². Not for Resale |
![]()
![]()
![]()
![]()
|
4 |
|
Peregrine EDi and 1300 Series EDi |
|
14 Fit the setscrews by hand. If they do not fit freely by hand, fit new setscrews. If the new setscrews do not fit freely by hand, renew the connecting rod. |
|
15 Tighten the setscrews gradually and evenly to 156 Nm (115 lbf ft) 15,9 kgf m. 16 Ensure that the crankshaft rotates freely. |
|
17 Check the side clearance of the connecting rod big-end. Refer to the relevant Data and dimensions for the "Connecting rods" on page 13. |
|
18 Fit the lubricating oil strainer and suction pipe, see Operation 10-11. 19 Fit the lubricating oil sump, see Operation 10-10. |
|
20 Fit the cylinder head assembly, see Operation 3-9. |
|
21 Fill the sump to the correct level with lubricating oil of an approved grade, see Chapter 5 in the User’s Handbook. |
|
22 Fill the cooling system. |
|
Workshop Manual, TPD 1353E, Issue 3 |
|
57 |
|
This document has been printed from SPI². Not for Resale |